Showing posts with label No-Sew Projects. Show all posts

Monday, April 30, 2012

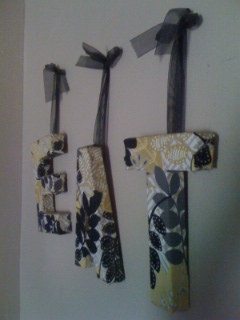
Eat Your Heart Out!

Just when you think there isn't anything else you can do with your leftover scraps of fabric, "eat" your words, friends!  There is another small project just around the corner, or wall!  (Okay, I promise - no more cheesy jokes.)  I found this little venture on one of my favorite blogs, A Bowl Full of Lemons.  It's easy, it's quick and my favorite part - totally affordable! 

The original idea came from Pottery Barn's moss letters.  If you're anything like me, your eyes went straight to the price line - these babies walk out of stores at $79/each!  Can you believe it?  Now, don't get me wrong, I delight in walking the aisles of Pottery Barn, but I can only dream of decorating my home at prices like that.  In true D.I.Y. style, A Bowl Full of Lemons took the idea and made it something people like me could fashion in a home like mine. 

Supply It:
  • Three letters, "E" "A" "T" - I scooped these up at Hobby Lobby for $2.47 here.  Now, can you believe that price?
  • Hot glue
  • Fabric scraps of your choice
  • Ribbon
  • Scissors  
  • Nail & hammer
 Let's Do This:
  1. Lay your fabric out and cut around the letters, giving some extra fabric to fold over the back.
  2. Take your glue gun and fold the pieces over as if you're wrapping a gift.  Note:  During this stage - be forgiving.  The corners are hard to perfect. 
  3. Once you've allowed your letters to cool and the fabric is set, take your ribbon and make a long loop and tie a nice bow to hang your letters.  I use the glue gun again to paste the ribbon on the back of each letter.  So easy!
  4. Take your wall of choice, your nail, and hammer that little beauty in.  Stagger, space and shazam, friends!  You have a nice little addition to your kitchen wall.  
  5. Easy as E-A-T!
  6. Now...what to cook?


Wednesday, March 21, 2012

No-Sew Fabric Covered Headboard

And, might I say, this was one of the easiest, most affordable way to transform my boring queen size bed!  At the time I took on this project, I was searching for the perfect headboard, but one I could afford.  Those suckers are PRICE-EE!  When I stumbled on Young House Love's tutorial on how they transformed their guest room's headboard, I was hooked. 

Materials I used:
  • Plywood (free - backyard find) - I actually had this wood in my backyard.  We're currently rennovating our house and I had two huge pieces from all the work we're doing.  It wasn't being used, so jackpot for me!
  • Fabric ($20ish) - Pending on how big you want your headboard, this will depend on how much fabric you need.  Just measure ahead of time and get plenty of it.  Hobby Lobby was my stop for this.  I recommend the 54" wide for a queen bed or more because you want to cover your board without having to cut your fabric in half and see the seams. 
  • Batting ($10ish) - Also at Hobby Lobby and I don't remember exactly how much it was, BUT, there are a million to choose from.  Just go with the thickness you desire for your board.  You can't really mess this up.  I think I even asked one of the Hobby Lobby Ladies for help - she was very generous and pointed me in the right direction (and complimented me later on my choice of fabric, always a plus.)
  • Elmer's Spray Adhesive ($6.99 found here at Hobby Lobby) - I'm sure you can use any brand.  But, Elmer served me well. 
  • Scissors (free - in my kitchen drawer)
  • Jigsaw (free - borrowed) - You'll be amazed at how many supplies your neighbors, friends, and family members own.  Don't be afraid to "just ask" for a simple borrow-for-a-day item.  Take care of it and return it.  You'll save a lot of money this way.
To give you the idea of what I was dealing with:
To remedy:
  1. Measure behind your bed the length and height you want your headboard to sit/hang.
  2. Once measured, cut your wood (with a jigsaw) to those measurements.
  3. Using your cut wood, take the fabric and place it under your wood.  Cut the fabric giving a little extra room on the sides and corners.  In other words, let your fabric "hang" off the wood.  (This will allow you to "wrap" the fabric around the wood)
  4. Do the same with your batting.
  5. Using your batting first, place it under your wood and use your spray adhesive to attach the batting to the wood.  
  6. Do the same with your fabric to the batting.
  7. Once the two are attached, "wrap" the corners, using your spray adhesive.
  8. Let it dry - for an hour or two.  
  9. Ta-Da!:

Quite a difference, right?  I have added pictures, too above the headboard to add more pizazz.  But, I think it's a great project and any first DIY-er can do this.  

Now, I know those directions aren't great without pictures - but YHL does a great job with words and pictures.  Once I start blogging more and designing more, I will take more pictures to help with directions.  Until then, please visit Young House Love and drool over their blog and all their beautiful ideas and DIY projects.  The above link will take you directly to the headboard directions, including pictures.  

Oh - and total used on this bad boy - $37ish.  I say that's quite. a. deal.  Wouldn't you?