Showing posts with label Fabric. Show all posts

Friday, July 13, 2012

Rockin', Rollin' and SEWIN'...

Never in a MILLION, TRILLION years would I have guessed that I would be telling you, my blogging family, about a small little business of mine.  Wait, let's rewind - blog and business.  Those two "b" words were never in my vocabulary before.  It's been so thrilling to introduce these two words into my language!  Who would have thought that Mom's Christmas purchase in 2011 would turn into the best gift that kept giving in 2012?

After week one of opening my Southern Sewendipity Facebook page, I have completed 8 orders of custom, homemade clutches for 2 sisters, 2 co-workers, 1 out-of-state friend, 1 "2nd mother", and 2 girlfriends.  Believe it or not, I just confirmed 1 additional order for another.  The world of technology and word-of-mouth is a girl's best friend when it comes to advertising her favorite accessory.  In the world of marketing and accessories, 8 is a small, very tiny number in comparison to companies like Coach or Vera Wang.  But, let's face it - I'm just a Southern girl, in a small town, just doing what she loves.  So, eat your heart out, Vera!  I see eight as the new 1K!  

Lessons learned so far:


  1. Don't be afraid to "take the plunge", even it means standing at the edge for a long time.  Don't watch what everyone else is doing...you'll jump when you're ready.  
  2. Practice.  You learn more with every step. 
  3. Ask for help.  There are many people willing to give you great advice.  
  4.  Let your creativity flow...sewing leaves the door WIDE open to create things that reflect you.  Take advantage of allowing this opportunity to show others a side they may have never seen before.
                                                                  and....
  5. Don't forget to HAVE FUN.  Sewing has become a hobby for me.  Something I enjoy doing when everything else around me isn't enjoyable.  Don't let it become "homework." 
 I think it's time to introduce Southern Sewendipity's line-up.  I think they are a pretty fabulous crew, don't you? 

(Don't forget, you can inquire more with our Etsy Shop: here and visit us on Facebook here):

"Wild Thang"


The "Su-Su" clutch (named after my Mom a.k.a Su-Su)


"Southern Belle"


"Chevron"
"Summer Sky"


Tuesday, June 12, 2012

Addicted

You may remember my post here when I introduced the wonderful world of clutches, or at least, the homemade kind.  I didn't realize at the time, I would fall so IN LOVE with them and making them.  I carry mine around like a champ.  I don't know what it is that has me so hooked in creating such a fabulous accessory, but it's totally my favorite sewing homework assignment right now.

Since creating my black and red beauty in April, I have made three others:  one for Mom, one for a dear friend and just finished one last night for my sister!  If had more fabric, believe me - a fourth would have made its debut.  Over the last month, I have learned the fun in making each purse one-of-a-kind.  Between choosing your fabric to picking out your pattern for the "flap" verses your "purse" and my latest addition:  a little embellishment.  The ways to make a Southern Sewendipity clutch are endless!  


Here are the final products:


Tuesday, May 8, 2012

From Old to New: A Throw Pillow

For months now, I've had my eye on the dreaded, boring, wide-striped, brown and green throw pillow in my guest bedroom.  A few years ago, it was a total steal at Target.  I loved it.  However, since my sewing ventures, I've wanted to really tackle it and convert it into something new and fresh for my bedroom (now in greys, blues and black).  This Saturday was another Sewing Circle day and a perfect opportunity to take on the challenge. 

The girls and I sat around as I pulled the pillow out among the sea of fabrics - you should have "seen" the wheels turning!  To re-cover it seemed like the easiest choice, but no one knew how to sew in a zipper and to make an outside stitch wasn't appealing to me or anyone else.  Then, it was like the silent wheels in our heads stopped and one spoke up and asked, "What about ties?"  Perfect.  That'll do it.  Our beloved teacher was unable to attend last minute, so it was up to us to help each other in completing each project: a few square pillows, 1 tie throw pillow (my project), a duvet cover, and the most grueling?  Recovering a couch.  Yes.  You read that correctly.  One of us decided to take the plunge and wanted to re-cover an old couch.  Let's just say I'm glad I'm not giving you a tutorial post on how to make covers for your cushions.  (Now, just in case your wheels are turning concerning my friend's supply list, she did not lug the couch to Sewing Circle - she only brought two cushions for measuring.  Rest assure, we're ambitious ones, but still very much girls in the truest sense when it comes to carrying our supplies to class).

For my project, all you really need is a throw pillow, some fabric (about 1/2 - 1 yard, depending on the size of your pillow, of course) and some thread.  Easy, peasy!

How To:

1. Cut your fabric to cover your pillow - make sure you leave enough on the sides to make holes for your ties.  Then make a nice fold with the side you want showing together:


2.  Sew your seams.  They should look something like this: 


3.  Next, measure (mine were about 24" each in length) and sew your ties. This was a little bit more time consuming than I had anticipated.  But, totally worth it.  You may choose to leave them with a frayed look and that is totally acceptable.  It all depends on the "look" you're wanting with your pillow.  I desired a more polished throw, while others may want a more rugged, unfinished look - which I think could look just as great (and certainly way less time consuming)!


4.  Now, you're ready to stuff your pillow in your new lining to prep for the tie holes.  I took my trusty tape measure to see exactly where I wanted the holes.  I decided on two on each side for now, especially after sewing those pesky ties.
 
Then, I took my pins and used those as markers for where I wanted them. 

5.  I'm not proud of this moment - but I decided to make a small cut for each of the 4 holes.  I haven't conquered the world of button holes on my machine, but I will and I'm sure I'll fall in love with it.  But, until that day arrives, I settled for a simple, very unprofessional "half-moon-fold-material-together" kind of cut.  And, I think it worked out just fine.  Besides, no one can really see the unpolished holes because the ties are that adorable, don't you think?


6.  The last step is to put your ties through your holes and simply tie a knot or a bow - the choice is yours, my friend!  Clearly, my very outdated iPhone takes poorer pictures than my digital camera.  Lesson learned.

Monday, April 30, 2012

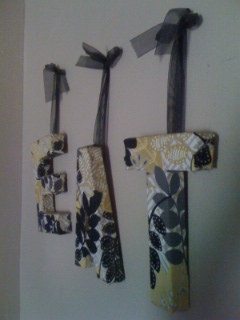
Eat Your Heart Out!

Just when you think there isn't anything else you can do with your leftover scraps of fabric, "eat" your words, friends!  There is another small project just around the corner, or wall!  (Okay, I promise - no more cheesy jokes.)  I found this little venture on one of my favorite blogs, A Bowl Full of Lemons.  It's easy, it's quick and my favorite part - totally affordable! 

The original idea came from Pottery Barn's moss letters.  If you're anything like me, your eyes went straight to the price line - these babies walk out of stores at $79/each!  Can you believe it?  Now, don't get me wrong, I delight in walking the aisles of Pottery Barn, but I can only dream of decorating my home at prices like that.  In true D.I.Y. style, A Bowl Full of Lemons took the idea and made it something people like me could fashion in a home like mine. 

Supply It:
  • Three letters, "E" "A" "T" - I scooped these up at Hobby Lobby for $2.47 here.  Now, can you believe that price?
  • Hot glue
  • Fabric scraps of your choice
  • Ribbon
  • Scissors  
  • Nail & hammer
 Let's Do This:
  1. Lay your fabric out and cut around the letters, giving some extra fabric to fold over the back.
  2. Take your glue gun and fold the pieces over as if you're wrapping a gift.  Note:  During this stage - be forgiving.  The corners are hard to perfect. 
  3. Once you've allowed your letters to cool and the fabric is set, take your ribbon and make a long loop and tie a nice bow to hang your letters.  I use the glue gun again to paste the ribbon on the back of each letter.  So easy!
  4. Take your wall of choice, your nail, and hammer that little beauty in.  Stagger, space and shazam, friends!  You have a nice little addition to your kitchen wall.  
  5. Easy as E-A-T!
  6. Now...what to cook?


Tuesday, April 17, 2012

Clutch Me

Every lady needs a clutch - a small "handbag without handles".  I love them, especially when painting the town red or having a glass of wine with my girlfriends.  For whatever reason, they make you feel dainty and more girly.  If you don't have one, make one!  I used the "It's So Easy It's Simplicity" pattern (to the right).  It's pattern #2906 and includes two skirts and one clutch pattern.  If you've never used this company for pattern ideas - I highly recommend them.  They're super affordable and for the most part, easy to follow.  

The first step is to cut your fabric according to your pattern pieces.  When you have more than one item in your pattern, remember to only cut the pieces you need.  For example, in this number I only needed pieces for the purse - so make sure you leave the other pieces for the skirt to use later, if you choose to dive into sewing a skirt! 


In this case, I needed to cut 1 piece for my lining, 2 pieces for the outside (the main color/pattern of your purse) and 2 pieces of the interfacing - what makes the purse tough to carry around those important things while you're out and about.  Make sure you mirror the triangles like you see in the picture above - this will come in handy when you have to match them up later.

The next several steps are outlined in your pattern directions.  The finished product is well worth the cutting, sewing, lining, matching, and hours spent.  I recently carried mine to a very important afternoon meeting.  It totally pulled my outfit together and was so handy.  So, whether you're out with your honey, or just want to add a little pizazz to any outfit - go with a clutch!  I promise you won't regret it, especially when you make it yourself.  


Wednesday, March 21, 2012

No-Sew Fabric Covered Headboard

And, might I say, this was one of the easiest, most affordable way to transform my boring queen size bed!  At the time I took on this project, I was searching for the perfect headboard, but one I could afford.  Those suckers are PRICE-EE!  When I stumbled on Young House Love's tutorial on how they transformed their guest room's headboard, I was hooked. 

Materials I used:
  • Plywood (free - backyard find) - I actually had this wood in my backyard.  We're currently rennovating our house and I had two huge pieces from all the work we're doing.  It wasn't being used, so jackpot for me!
  • Fabric ($20ish) - Pending on how big you want your headboard, this will depend on how much fabric you need.  Just measure ahead of time and get plenty of it.  Hobby Lobby was my stop for this.  I recommend the 54" wide for a queen bed or more because you want to cover your board without having to cut your fabric in half and see the seams. 
  • Batting ($10ish) - Also at Hobby Lobby and I don't remember exactly how much it was, BUT, there are a million to choose from.  Just go with the thickness you desire for your board.  You can't really mess this up.  I think I even asked one of the Hobby Lobby Ladies for help - she was very generous and pointed me in the right direction (and complimented me later on my choice of fabric, always a plus.)
  • Elmer's Spray Adhesive ($6.99 found here at Hobby Lobby) - I'm sure you can use any brand.  But, Elmer served me well. 
  • Scissors (free - in my kitchen drawer)
  • Jigsaw (free - borrowed) - You'll be amazed at how many supplies your neighbors, friends, and family members own.  Don't be afraid to "just ask" for a simple borrow-for-a-day item.  Take care of it and return it.  You'll save a lot of money this way.
To give you the idea of what I was dealing with:
To remedy:
  1. Measure behind your bed the length and height you want your headboard to sit/hang.
  2. Once measured, cut your wood (with a jigsaw) to those measurements.
  3. Using your cut wood, take the fabric and place it under your wood.  Cut the fabric giving a little extra room on the sides and corners.  In other words, let your fabric "hang" off the wood.  (This will allow you to "wrap" the fabric around the wood)
  4. Do the same with your batting.
  5. Using your batting first, place it under your wood and use your spray adhesive to attach the batting to the wood.  
  6. Do the same with your fabric to the batting.
  7. Once the two are attached, "wrap" the corners, using your spray adhesive.
  8. Let it dry - for an hour or two.  
  9. Ta-Da!:

Quite a difference, right?  I have added pictures, too above the headboard to add more pizazz.  But, I think it's a great project and any first DIY-er can do this.  

Now, I know those directions aren't great without pictures - but YHL does a great job with words and pictures.  Once I start blogging more and designing more, I will take more pictures to help with directions.  Until then, please visit Young House Love and drool over their blog and all their beautiful ideas and DIY projects.  The above link will take you directly to the headboard directions, including pictures.  

Oh - and total used on this bad boy - $37ish.  I say that's quite. a. deal.  Wouldn't you?